How to Crimp Hair Without a Crimper: 7 Easy Methods That Actually Work
 David Osborn
That distinctive zigzag texture once dominated 80s and 90s hairstyles, but crimped hair has made a stunning comeback on runways, red carpets, and social media feeds. The problem? Not everyone owns a crimping iron, and those who do often worry about the heat damage these tools can inflict on their strands. The good news is you don't need specialized equipment to achieve that coveted textured look.
Professional hairstylists have been creating crimped effects for decades using nothing more than braids, twists, and basic household items. These heat-free methods not only protect your hair from thermal damage but often produce more natural-looking results than traditional crimping irons. Some techniques take just minutes, while others work their magic overnight as you sleep.
Understanding the Crimped Hair Effect
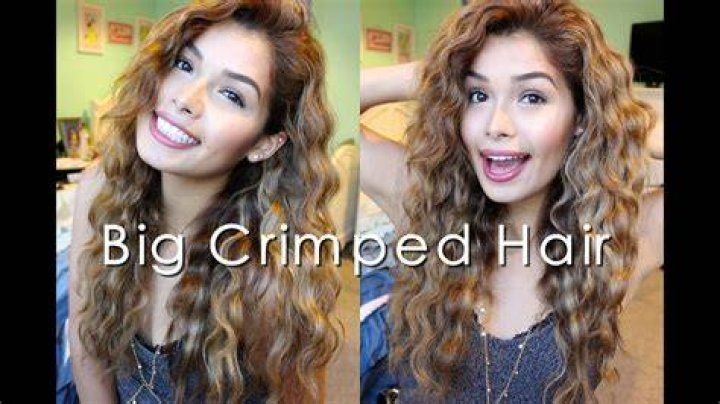
Crimped hair features a consistent wave pattern that adds substantial volume and dimension to any hairstyle. Unlike natural waves or curls, crimping creates uniform bends throughout each strand, resulting in a textured appearance that can make fine hair look fuller and thick hair more manageable. The style works on virtually any hair length, from short bobs to waist-length locks.
The key to successful crimping without a crimper lies in manipulating your hair's natural ability to hold a shape when set. Hair is remarkably moldable when damp, and it maintains whatever pattern you create as it dries. This scientific principle forms the foundation of every heatless crimping method.
The Classic Braid Method
Small, tight braids remain the most reliable way to crimp hair without specialized tools. Start with clean, slightly damp hair—not soaking wet, as this extends drying time considerably. Apply a light styling mousse or texturizing spray from roots to ends, which helps the crimped pattern hold longer once you release the braids.
Divide your hair into sections. The smaller your braids, the tighter your crimps will be. For a subtle wave, create six to eight braids. For dramatic, zigzag crimps reminiscent of traditional crimping irons, you'll need twenty or more thin braids. Braid each section all the way to the ends and secure with small elastics.
Timing matters significantly. If you can sleep with the braids overnight, you'll wake up to perfectly set crimps. Can't wait that long? Use a blow dryer on low heat to speed up the drying process, or let braids air dry for at least four hours. The hair must be completely dry before you unbraid, or the pattern won't hold.
Twist Techniques for Varied Textures
Two-strand twists create a different crimping effect than braids—slightly looser and more rope-like. This method works exceptionally well on naturally textured or curly hair types. Start by dividing damp hair into small sections, then split each section into two strands. Twist them around each other tightly, winding all the way down to the ends.
For even more texture variation, try flat twists close to your scalp. These lie flat against your head and create a crimped pattern that's tighter at the roots and gradually loosens toward the ends. This graduated effect looks incredibly natural and adds serious volume to the crown area.
Some people prefer the "rope braid" approach, which involves twisting two sections of hair individually in the same direction, then wrapping them around each other in the opposite direction. This creates tension that results in exceptionally defined crimps. Secure the ends, let everything dry completely, and gently unravel.
The Aluminum Foil Technique
This method mimics the plates of a traditional crimping iron using household aluminum foil and a flat iron. Cut several strips of foil, each about four inches wide and eight inches long. Fold each strip into an accordion pattern, creating sharp creases that form a zigzag shape.
Take a small section of dry hair—about half an inch wide works best. Wrap it around your foil accordion, ensuring the hair follows the zigzag pattern precisely. Clamp your flat iron over the foil for ten to fifteen seconds, applying gentle pressure. The heat conducts through the foil, setting the crimped pattern into your hair.
Move down the hair section systematically, crimping every part from roots to ends. This technique produces results nearly identical to a traditional crimper but requires more time and patience. Always use a heat protectant spray beforehand, and don't exceed your flat iron's medium heat setting to prevent damage.
Chopstick and Bobby Pin Methods
For those seeking tighter, more defined crimps, chopsticks offer a creative solution. Dampen your hair and take a thin section. Weave it over and under a chopstick in a figure-eight pattern, creating tension as you go. Secure both ends with bobby pins or small clips, and repeat throughout your head.
Leave these in for several hours or overnight. The chopstick method creates exceptionally uniform crimps because the rigid structure ensures consistent sizing throughout. You can adjust the tightness of your crimps by choosing thicker or thinner cylindrical objects—pencils work for very fine crimps, while markers create looser waves.
Bobby pins alone can also create crimped texture, though this requires significant time investment. Take small sections of damp hair and fold them in accordion pleats, securing each fold with a bobby pin. This creates sharp, geometric crimps but demands dozens of pins for a full head of hair.
Headband and Fabric Strip Techniques
Soft fabric strips or old t-shirts can create beautiful heatless crimps with less tension on your scalp than tight braids. Cut fabric into strips about two inches wide and ten inches long. Take a section of damp hair, place the fabric strip at the roots, and wrap your hair around it in a spiral. Tie the ends of the fabric together to secure.
This method is particularly comfortable for overnight styling because fabric doesn't dig into your scalp like elastics might. The crimps created tend to be softer and more wave-like than braid-induced crimps, perfect for those wanting a gentler textured look rather than sharp zigzags.
Headband curls can also produce a crimped effect. Place a stretchy headband around your crown, then wrap sections of damp hair up and around the band, tucking the ends under. As your hair dries in this position, it develops bends and waves that resemble loose crimps, especially if you wrap the hair in smaller sections.
Making Your Crimps Last
Preparation determines longevity. Always start with the right products—a volumizing mousse or texturizing spray applied to damp hair helps hold the crimped pattern much longer than crimping clean, product-free hair. Avoid heavy oils or serums before crimping, as these weigh down the texture.
Once you've created your crimps, resist touching them excessively. The natural oils from your hands can cause the pattern to relax prematurely. Instead, shake your hair gently at the roots to separate the crimps and add volume. A light mist of flexible-hold hairspray preserves the texture without making it stiff or crunchy.
Sleep carefully to maintain crimped hair overnight. Gather your hair loosely on top of your head in a pineapple-style arrangement, or sleep on a silk pillowcase that creates less friction than cotton. Some people find that loosely re-braiding crimped hair before bed helps maintain the texture for an additional day or two.
Avoiding Common Mistakes
The biggest error people make when crimping hair without a crimper is removing braids or twists before hair has completely dried. Damp hair will immediately begin to relax, and you'll lose most of your crimped pattern within an hour. Patience is essential—wait until every section feels absolutely dry to the touch.
Another frequent mistake involves using sections that are too thick. Large sections won't crimp evenly, especially in the middle of the braid or twist where less tension occurs. Thinner sections take more time to create but deliver dramatically better results. Think smaller than you believe necessary.
Over-brushing freshly crimped hair destroys the texture quickly. Instead of running a brush through your crimps, use your fingers to gently separate and arrange them. If you must use a tool, a wide-tooth comb works far better than a brush, and only use it on the very ends if they've become tangled.
Frequently Asked Questions
How long does it take to crimp hair without a crimper?
The active styling time ranges from thirty minutes to two hours depending on your hair length and thickness, but the setting time is what really matters. Most methods require four to eight hours for the crimped pattern to fully set, which is why overnight styling works so well. If you're using heat with the aluminum foil method, you can complete the entire process in one to two hours since the pattern sets immediately.
Will crimping without heat damage my hair?
Heatless crimping methods are significantly gentler on your hair than traditional crimping irons or other hot tools. The main concern is tension-related stress from very tight braids or twists, which can cause breakage if done repeatedly in the same spots. Vary your part lines and section placements, and avoid braiding so tightly that you feel pulling on your scalp. Using fabric ties instead of elastic bands reduces tension and minimizes damage risk.
Can I crimp short hair without a crimper?
Short hair can definitely be crimped using heatless methods, though you'll need to adjust your technique. Small braids work well on hair as short as chin-length. For pixie cuts or very short styles, focus on the top sections where you have the most length, using the bobby pin accordion method or small twists. You won't achieve full-head crimps with very short hair, but you can add texture and volume where you have enough length to work with.
Final Thoughts
Crimping hair without a crimper isn't just possible—it's often superior to using heat tools. These methods offer more control over your final texture, cost nothing or very little, and protect your hair from the cumulative damage that hot styling tools inevitably cause. The trade-off is time, but most techniques work beautifully overnight while you sleep.
Experiment with different methods to discover which produces your favorite results. Your hair type, texture, and personal style preferences will determine whether tight braids, loose twists, or the aluminum foil technique works best for you. Start with clean, slightly damp hair, use appropriate styling products, and exercise patience while the pattern sets. With practice, you'll develop an efficient routine that delivers consistently gorgeous crimped hair without ever plugging in a single tool.
